Warung Bebas

Wednesday, December 28, 2011

Colour B4 Review

I was recently wowed by the wonders of Colour B4, a DIY hair dye remover retailing at £12.25. My friend Stevie at work had dyed her gorgeous ginger locks brown and then had a change of heart. With the help of Colour B4, she was able to get back to her natural colour easily, without having to bleach or grow the colour out.

I am happy as a brunette (my natural colour is dark blonde), but am also a curious Gemini, so when Colour B4 contacted me to see if I'd like to try it out, I thought 'why the heck not'. 

I mixed up the necessary bits and bobs, just like a normal hair dye and applied it, wrapping my hair in cling film after (as recommended by some people online). Cold air stops the product working so well (the instructions even state not to apply it in a cold room!) so cling film and central heating were a must! By the way, this stuff reeks of rotten eggs, and your hair will have this subtle stench for a short while after using!


The process is a tad laborious for anyone as impatient as me, as once the allotted 20 minutes is up, you have to rinse the hair for 10 minutes - without fail - to get the old dye pigments out of the hair. Snooooze. On the plus side, you can use it thrice in one sitting depending on the end result you want to achieve. 

Let's remind ourselves of my hair 'B4'! Black with brown roots. Yum. 


And this was it after using Colour B4. A browny red colour, still with brown roots funnily enough. 


So did it work for me?

Well, not as such. I had naively assumed that it would strip my hair back to my natural dark blonde colour, not leave me with red hair. It definitely did lighten the hair, but it was nowhere near the colour I was 'B4' I started dyeing my hair black. But this product was up against years and years of black hair dying, so the fact it did anything is remarkable in it's own way. I have since seen on the product information on Boots' website that although it isn't printed in the instructions, the directions have been updated to suggest you leave the extra strength formula on your hair for an hour per sitting, not 20 minutes. I imagine this would've made a lot more of a difference to the end result and should I try it again, this is definitely something I'll be doing. Slightly annoying that it wasn't in the instructions when I used it, really!

To conclude: I think it's definitely worth using if you've had a hair dye mishap like Stevie, but be prepared  for a longer ride if you're stripping out built-up hair dye. 

After all this, I decided to embrace red hair for a while so I bought a lovely dye from Boots to even out the colour and bunged it on, forgetting about my un-dyed roots... I ended up with dark red ends and fluorescent orange roots. NOT good. Seeing as my staff party was that night, I thought 'eff this' and dyed my hair dark brown. 

All in all, a bit of an ordeal really, but mostly due to my own idiocy! 

Have any of you tried this stuff out? What did you think? 

Saturday, December 24, 2011

Christmas EEEve!!

So anyway, it turns out that being a decent blogger and working in retail at christmas is a mega contradiction! But rather than stress myself out about the posts I didn't get round to blogging on-schedule, let's try to remember what this holiday is really all about: presents and food! Oh, and dressing festively for work! 

Poundland had sold out of antlers, so my seasonal sartorial effort consisted mainly of stealing some holly tinsel from the tree, donning it as a belt, and then having my work pals spray glitter on my bonce! 


(Dress - H&M, Cardi - Charity shop)


You can't really see 'em but I wore my new black desert boots I found in a charity shop yesterday! They were £7.99, which nearly made me vom in my mouth (Anything over £5 in a charity shop angers me), but I had been looking at pairs on eBay for like £10, so I got over it. 

Sooo, what are you lot up to for crimbz tomorrow?! Alex and I are having a cosy christmas for two and then heading to my mum's tomorrow for a couple of days. I'm mega excited but am sliiightly nervous about all the cooking and that. Wish me luck! 

Hope you all have a totally amazing day! 

xxx

PS - Is it wrong that I am kinda excited for christmas to be over so I can raid Boots' half price gift sale on Boxing Day..?! 

Sunday, December 18, 2011

Creative Crimbo: Gift wrap ideas!

As I'm on a surprise excursion to Scotland, I am ridiculously behind on my festive postings! I thought I'd cheat a little tonight and post some little gift-wrap ideas from the DIY book I made as part of my Final Major Project at Uni:

(I am aware there is a typo on this last page, but don't have time to edit as I'm running late for dinner!)

Other ideas:

♥ Wrap pressies with layers of different designed paper (or layers of coloured tissue paper) and pop little sweets or small gifts in between each layer - a la pass the parcel! 

♥ Instead of using normal gift tags, search websites like Pinterest to find amazing printable ones to give your gift more of a unique touch!

Anyone else got any cute and easy gift wrap tips or links to share? 

And is anyone else finding the proximity of christmas absolutely terrifying? SO much I still need to do/blog/bake and no time to do any of it! Aaarrghh! Here's to the last night in the snowy wonderland of Aberdeen before it's back to madness tomorrow...


Monday, December 12, 2011

What I've been up to:

Taking very rushed outfit photos in the mornings before work. The 'why must you blink every time I press the shutter down?' 8am showdown just doesn't get old. Oh wait, it does! 

(Dress - Topshop, Jumper and Shoes - charity shop)

(Dress - New Look sale, cardi - charity shop)

(Clarks loafers - charity shop, Frostbitten Ankles - model's own... definitely too cold to have anything exposed at the mo!)

Spending the weekend by the sea, visiting friends, family and charity shops. I painted my nails using Models Own Peacock Green on the train there. It's beautiful and has barely chipped after 4 days wear and NO topcoat! My phone's cam didn't really capture the shimmer, but luckily Google has better pictures of it. 


My outfit for our very cold mooch round the charity shops on Saturday:

(Jumper - c/o Tesco, Dress - H&M)

Sunday morning wanderings round Brighton with our pals:

It's a pineapple shaped flask and cup set!! 

Danielle snooping out a bargain...

We met this chilly little chappy! Aww, he melted my heart. Can anyone tell me what breed this guy is? I want one. 

Beyond Retro. Literally.

As if this boy needs ANY MORE damn t-shirts. A new one arrives in the post almost every week! Usually with Morrissey's face on it. Should I be worried?

A visit to Bill's to scope out the bloody overpriced  lovingly handmade culinary delights...

Then it was home time, where we had to catch 2 trains and a replacement bus to get home. It took over 3 hours! To cheer ourselves up, we put all of our christmas decorations up in the lounge :D


Cute DIY tin lanterns are all around!

Our adorable russian doll-style festive friends from the Paperchase sale in January!

In other news, I've been working heaps but am looking forward to our trip to Aberdeen on Thursday (home on Monday night). Going to try and keep on top of blogging while I'm there as I have so many cool tips to share but cannot for the life of me find the time to photograph and blog them at the minute! 

Ooh, and while I'm here, I must tell you about the insane deal on in Boots at the moment which I've asked Alex to buy me for christmas. You get ALL THIS No7 gear for £30. I reviewed the face creams on the blog before and haven't been able to afford to buy any more. The day and night cream are over £20 each as it is, so to get all this stuff for £30 is too good to pass up! Totally eyeing this one up for mum's christmas prezzie, too! 

Speak soon, meine lieblings! 

<3


Tuesday, December 6, 2011

Everything sounds cooler 'en Francais'

I was scoping out Nylon's blog the other day and saw a post they did about these amazing t-shirts from Colette (an uber cool Parisian concept store)! They're made by a company called Le Musique, and feature popular song titles, translated into French and lovingly bunged on a t-shirt. 

I made a little graphic of them, mainly as an excuse to use some of the free textures I downloaded from Pugly Pixel. It is a truly incredible blog for anyone that likes to get creative and have fun with layouts. (Says the only blogger still using a Blogger template layout... I'll get there in my own time!)

They cost about £35 each, which is cheap by Colette's standards (Karl Lagerfeld was having a casual browse last time I was there!) but I am tempted to get my Sharpie fabric pen out and DIY! I would have to be having a good handwriting day, and would have to approach Google's translate function with caution (aka. go ask a french human), but it's definitely on the to-do! 

<3

PS - Christmas craft/gift tips are on the way, but my hectic schedule means they won't be posted solely on Tuesdays. I figured let's let some other days of the week get in on the DIY action for once. And if you ask me, Tuesdays were letting the attention go to their heads a bit!

Topshop Nail Art Pens ♥

The title of this post pretty much sums up my review of the newly launched Topshop Nail Art Pens - they are incredible! I am the makeup specialist at the Canterbury store and have been waiting for months for these to come in stock and they are finally here. They are available in pink, blue, silver, white and (as of today) black, and are priced at £6.50. I bought the pink one to try out over the weekend, and it's safe to say I shall be asking santa for the whole collection!

Unlike regular nail art pens, they are built like an actual pen, with a pointy tip which you pump once or twice on a surface to get the product to flow. This precision tip and the skinny build of these pens makes them so incredibly easy to use. The first manicure I gave myself with them was a Mr Messy style scribble on every nail because I love the way you can easily scribble and doodle like you would with a pen! Another plus is that the paint doesn't smudge at all when you put a topcoat on! 

My only slight concern is how well these will last, as the amount of paint left on the nib makes me think it will dry out or block up quite quickly. This is only hypothetical, and certainly for now this product is blowing my mind!

I've recorded a short demo video so you can see the product in action, and below are some pictures of a quick mix-and-match design I've created this morning. 


My base colour is from the new beauty range from Look Magazine, 'Look Beauty'. It's called Flamingo and is a gorgeous peachy colour (a bit more toned down than these photos, taken with a flash). The Look Beauty range should be available in Superdrug very soon! 


As I explain in the video, regular nail art pens have a metal nib which you have to squeeze product out of, which can detract from drawing shapes and patterns wobble-free. Also, the metal nibs tend to scratch through the design as you draw it, so you end up having to go over it again, which makes it harder to get a nice smooth finish.  

I've demonstrated the Topshop Pen versus my beloved Wah Nails pen below:


I think my Wah Nails pen will always be my go-to for leopard print, but for more intricate designs, my heart has been stolen by these Topshop Pens... I just feel like I can do SO MUCH MORE now! You can see my first ever attempt at a bit of aztec above on my little nail! I want to get a white one next and see if I can draw some little anchors, as with the metal nibbed nail pens, mine always go horribly lumpy and gross. 

If you like nail art, or want an easy way to get into it, you need to get these on your christmas list. 

<3

Tuesday, November 29, 2011

Tuesday Tip: DIY Pom Pom Wreath!

I've seen a few different pom pom wreaths around the interweb before and decided to have a go at making my own festive variation, whilst (true to form) cutting as many corners as possible. I give you: THE EASIEST POM POM WREATH EVER MADE.


So for this uber easy take on a festive pom pom wreath, you will need: wool, scissors and a wire hanger. That's all!


- Choose the colours you want your pom poms to be (I bought green, red and cream from C&H Fabrics at about £1.50 each)

- Make pom poms! You can make them all one colour or mixed. Both of my techniques are explained in this tutorial I filmed earlier. It was a bit rushed as I wanted to get this post up before midnight, so if I'm unclear, do ask questions! The best thing to do is probably use my tutorial as a template and work out your own technique as you go along.


- Once you have made about 20, carefully untwist a wire hanger (use pliers or a boyfriend if you're struggling), bend it into a circle (I trod on mine a bit to make the corners round) and then thread the pom poms on in whichever sequence you want.


- Twist the top of the hanger back up and cover up the fugliness by wrapping some wool tightly around it. You could also use ribbon. And maybe tie a bow! Ooh I've just decided I am going to do that to mine in a bit! Because I'd wrapped the wool round the hook quite tightly, I found I didn't need to tie it off or glue it once I'd finished wrapping the hanger.


- You could also add some tinsel, bows, festive beads or LED lights (Poundland are full of them) if you fancied. 

- Hang it on your door, or alternatively on a wall or in a window if, like me, you live in a city densely populated by moronic youths who would probably steal a fantastic pom pom wreath without a second thought, 'just for lolz'.


I hope you've enjoyed this christmas idea! It really is so easy to do and has quite a magical end result. You'd never know it used to be a crappy old hanger! 

More tips coming up - gift ideas and gift wrap will be hot topics! 

Mistletoe kisses!

<3

Sunday, November 27, 2011

Saturday's style

Oh how I love having weekends off! Yesterday was spent wandering round town with Alex, buying my few pieces of uniform from Topshop, eating some Tomato soup and having an afternoon nap.

Here's what I wore - special mention going to the black dress which was £9.99 in H&M. It doesn't really show up on the camera, but it is so very cute. See it here on the website, where it's only £7.99 at the mo!


(Belt: Primark, Leggings: H&M, Jacket, Shoes and Cardi: Charity shop)

The night was a different story altogether, as I had arranged a night out with my Topshop buddies to initiate the new staff. It was a roaring success and we drank, giggled and gossiped until the early hours. It was SUCH a fun night that I didn't take a single picture! Although, having checked my twitter profile this morning, I do now have some visual proof of the night I had... (Read from the bottom upwards!)


The shame!!! Oh well, I don't get tipsy often so one night of ridiculous tweeting should be allowed. It is my work christmas do on Saturday, though, so there *may* be a repeat performance...

Today has been spent sitting in my pyjamas, eating more soup (addicted at the moment!) and catching up on the X Factor. Loving Amelia Lily and Little Mix! I also must try out some of the beauty products I've been sent lately too so I can tell you all what's hot and what's not... On that note it's probably time to get dressed and crack on with some reviewing! 

Have you had a nice weekend? And is anyone else enjoying the X Factor this year? I sometimes feel like I'm the only one round here! 

x

Tuesday, November 22, 2011

Innocent Giveaway!

I was contacted by Innocent Drinks recently, who asked me if I wanted to design my own woolly hat as part of their Big Knit Campaign. Have you seen those Innocent bottles in the shops that wear little hats? Well it's not done purely for cuteness, it's all part of Innocent's Big Knit, which raises money for Age UK, a charity aimed at improving the quality of life for the elderly. Most of the little hats you see on the bottles in shops are indeed knitted and sent in to Innocent by the elderly themselves - no mass production here! 25p from each bottle sold goes straight to the charity.

So, I racked my brains for what I think the coolest hat design could be... And, me being me, I was inspired by a very special lady in my life...
[The exclusive design sketch, created by my slightly drunk boyfriend and I! Is it that obvious I failed my Art GCSE?]


And this is the life-sized masterpiece my Innocent knitter created for me! I love it! 

I wanted to share the cat hat joy with you guys so I'm giving away a little bottle-topping cat hat (below), some yummy innocent smoothies and - to keep in with the fruity theme - a Rimmel fruit scented nail polish (Cranberry flavour!) 


So, to enter, simply comment on this here blog post!

For an extra entry, post a tweet that includes the link to this post, an '@gemfatale' and an '@innocentdrinks'. Make sure you comment separately to let me know you've done this so it counts as an extra entry when I randomly generate the winner.

I'll be choosing the winner of this very cute prize on Monday morning, so you have until I get out of bed to enter. Usually 7-ish, sadly for me!

Good luck :)

xo

Tuesday Tip Digest!

Hello Darjeelings!

Sorry for the absence, I've had some stuff going on in the real world and haven't felt in the right frame of mind to be wittering on about clothes. 

Anyway, after a witter-free week, I'm back in action with a couple of tips to share from the blogosphere that I haven't had time to try just yet, but are definitely on the to-do list!

First up, this ridiculously useful idea from A Thrifty Mrs on how to organise your nail polish collection. My nail polishes are all in a floral storage box my mum got me. It's gorgeous but I have to pull every polish out individually to find the colour I want to use. Doesn't help that 80% of my collection is Models Own, which is utterly birds-eye-view-proof! 


(Images from A Thrifty Mrs)

As you can see, the trick is to apply a dot of the polish onto a sticker and - once dry - pop it on top of the corresponding bottle! Genius! 

The next tip is less everyday, but just so astoundingly cute nevertheless. I've been yearning for these Charlotte Olympia kitty flats for a while, so I was ecstatic to find this DIY tutorial on Pop Tart, which was a guest post from Kate of Scathingly Brilliant


(Images from Pop Tart)

Buy flats. Sew on the cats. Best idea ever, or what? You know I hate sewing machines (hence the zillion no-sew tips on this blog!) but I think even I can muster up a bit of hand-sewing for such a cute end result! 

Well, that's what's been inspiring me lately - have you seen or done any cute DIY's lately? 

<3

PS - More festive tips are on the way... 

Tuesday, November 15, 2011

Tuesday Tip: DIY Mini Advent Calendar

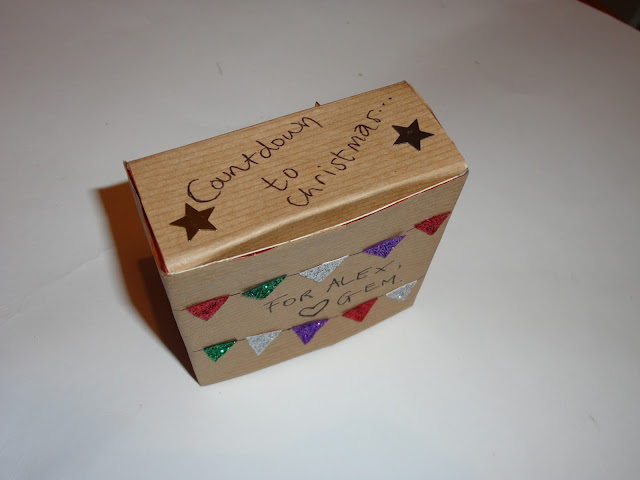
This ADORABLE festive craft project was inspired by these little chewing gum advent calendars I've seen around. Turns out it's a beyotch trying to get blister packs of gum in Canterbury so I had a little brainwave and decided that those yummy Bassets jelly vitamins would be an equally cute - and healthier - alternative to blister-pack gum. I bought some of their Vitamin C jellies - suitable for all ages - to help the boyfriend (my guinea pig for this tip) stave off man flu winter colds.  


Here's how it's done:

   
- Chop the bottom row of sweets off so you have 24 in total

- Place one sheet of sweets at the top of the box and chop off the surplus section of box - keep the very bottom of the box to tape back on!

- Tape the bottom of the box back on and DECORATE!! You can cover it in festive wrapping paper, or if you're feeling creative, personalise the design a bit more.

Using a Poundland card-making set, I made a christmas tree with glittery decorations and festive bunting on the other side! If you're crap at cutting shapes symmetrically, don't forget the old paper-folding trick


- Time for the best bit! Decorate the sweetie side with little festive drawings/sparkly confetti/anything you like, I'm not the boss of you! Draw numbers 1-24 on the back! You can do it sequentially or randomly to make it more fun. 


And you're done! It's one of those projects you can really make your own. You can do it in an hour or you can make a whole night of it, like I did last night! It's perfect for boyfriends, friends, children, and is a really cute project to add some fun to the festive countdown! 

Personalising your christmas will be a big theme on this blog over the next few weeks so do check back! :)

Do you have any cute christmas projects you want to try? 

Let me know what you thought of this idea! 

<3
 

gem and jam Copyright © 2014 Fast Money -- Powered by Blogger